Purpose:
This blog explains the Ambari Server in Installation on CentOS.
Architectural Information;
Ambari Server - 2.1
Operating System - CentOS or any Linux flavour
RAM - 2GB
OS Disk Space - Minimum 3GB
Prerequisites:
Preparation of Server before Ambari installation is required and detailed explanation can be reviewed from here

Download Repositories
http://public-repo-1.hortonworks.com/ambari/centos6/2.x/updates/2.1.0
Repo File
Once the Repostory is downloaded, we can check the current yum repository in our server. The command for the same is as below:
Next step is to install and setup the the Ambari on out server.
* Install Ambari Server-
postgresql-server.x86_64 0:8.4.20-6.el6
Complete!
Install Ambari-agent
* Setup the Ambari Server
This command will ask you mjultiple inputs like ambari user password, Metadata Database , JAVA Home etc. You can go ahead with default values and provide inputs for the passwords.
Once the installation is complete, your Ambari-Server setup will be completed.
* Start the Ambari-server and Ambari-Agent
[root@hadoopsirji yum.repos.d]# sudo ambari-server start/stop/status
[root@hadoopsirji yum.repos.d]# sudo ambari-agent start/stop/stauts
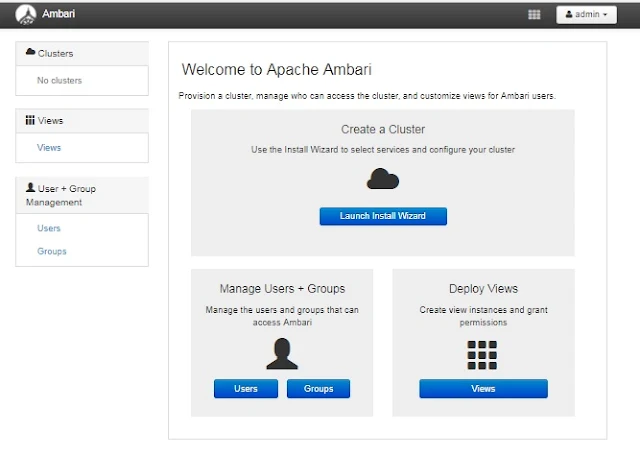
The default port which is available for Ambari Server to run is 8080. With Fully Qualified Host/Server name and port 8080 Ambari web manager can be accessed. By Default the credentials for ambari web page are admin/admin.
Open the browser and provide http://localhost:8080 (In case a hostname is provided, localhost will be replaced by it's name. In case of my system the link will be
http://hadoopsirji:8080
Default username and password are - (admin / admin)
Till now we have installed the Ambari-server and Ambari-Agent on one server. In multinode cluster, other nodes do not require to install Ambari-server. On other nodes, only Ambari-agent installation is required.
This blog explains the Ambari Server in Installation on CentOS.
Architectural Information;
Ambari Server - 2.1
Operating System - CentOS or any Linux flavour
RAM - 2GB
OS Disk Space - Minimum 3GB
Prerequisites:
Preparation of Server before Ambari installation is required and detailed explanation can be reviewed from here
- Check DNS
- Set up Password-less SSH
- Set up Service User Accounts
- Enable NTP on the Cluster
- Configure iptables – Disable IPTables (Temporarily)
- Disable SELinux, PackageKit and Check umask Value
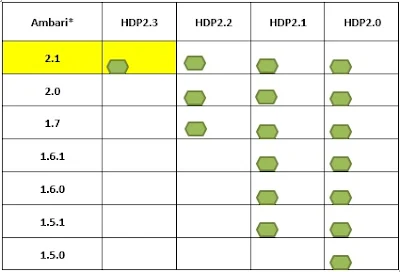
Determine Stack Compatibility:
We are planning to install Ambari2.1 and in further blogs we will explain the upgrade (Maintenance and Minor) Difference between Maintenance and Minor upgrade of Ambari-Server to 2.2.

Download Repositories
- Ambari 2.1 Repositories
http://public-repo-1.hortonworks.com/ambari/centos6/2.x/updates/2.1.0
Repo File
http://public-repo-1.hortonworks.com/ambari/centos6/2.x/updates/2.1.0/ambari.repo
Tar ball
http://public-repo-1.hortonworks.com/ambari/centos6/ambari-2.1.0-centos6.tar.gz
As we are interested here in Only installing Ambari on Linux, hence below Repositories will not be used here. But in next blogs where we will install and configure the Hortonworks Hadoop clusterware, we will use these repositories for installation.
- HDP2.3.0 Repositories
Download and configure the repository:
root@hadoopsirji yum.repos.d]# ls -lrt /etc/yum.repos.d/
total 16
-rw-r--r--. 1 root root 3664 Nov 27 2013 CentOS-Vault.repo
-rw-r--r--. 1 root root 630 Nov 27 2013 CentOS-Media.repo
-rw-r--r--. 1 root root 638 Nov 27 2013 CentOS-Debuginfo.repo
-rw-r--r--. 1 root root 1926 Nov 27 2013 CentOS-Base.repo
[root@hadoopsirji yum.repos.d]# wget -nv http://public-repo-1.hortonworks.com/ambari/centos6/2.x/updates/2.1.0/ambari.repo -O /etc/yum.repos.d/ambari.repo
2017-03-21 18:55:41 URL:http://public-repo-1.hortonworks.com/ambari/centos6/2.x/updates/2.1.0/ambari.repo [280/280] -> "/etc/yum.repos.d/ambari.repo" [1]
[root@hadoopsirji yum.repos.d]# ls -lrt /etc/yum.repos.d/
-rw-r--r-- 1 root root 280 Jul 21 2015 ambari.repo
Once the Repostory is downloaded, we can check the current yum repository in our server. The command for the same is as below:
[root@hadoopsirji yum.repos.d]# yum repolist
repo id repo name status
ambari-2.6.0.0-1094 ambari Version - ambari-2.6.0.0-1094 12
base CentOS-6 -Base 6,696
extras CentOS-6 - Extras 64
updates CentOS-6 - Updates 974
repolist: 7,746
repo id repo name status
ambari-2.6.0.0-1094 ambari Version - ambari-2.6.0.0-1094 12
base CentOS-6 -Base 6,696
extras CentOS-6 - Extras 64
updates CentOS-6 - Updates 974
repolist: 7,746
Next step is to install and setup the the Ambari on out server.
* Install Ambari Server-
[root@hadoopsirji yum.repos.d]# yum install ambari-server
Installing : postgresql-libs-8.4.20-6.el6.x86_64 1/4
Installing : postgresql-8.4.20-6.el6.x86_64 2/4
Installing : postgresql-server-8.4.20-6.el6.x86_64 3/4
Installing : ambari-server-2.6.0.0-1050.x86_64 4/4
Verifying : ambari-server-2.6.0.0-1050.x86_64 1/4
Verifying : postgresql-8.4.20-6.el6.x86_64 2/4
Verifying : postgresql-server-8.4.20-6.el6.x86_64 3/4
Verifying : postgresql-libs-8.4.20-6.el6.x86_64 4/4
Installed:
ambari-server.x86_64 0:2.6.0.0-1050
Dependency Installed:
postgresql.x86_64 0:8.4.20-6.el6
postgresql-libs.x86_64 0:8.4.20-6.el6 postgresql-server.x86_64 0:8.4.20-6.el6
Complete!
Install Ambari-agent
[root@hadoopn1 yum.repos.d]# yum install ambari-agent
Loaded plugins: fastestmirror, refresh-packagekit, security
Loading mirror speeds from cached hostfile
* base: del-mirrors.extreme-ix.org
* extras: del-mirrors.extreme-ix.org
* updates: del-mirrors.extreme-ix.org
Setting up Install Process
Resolving Dependencies
--> Running transaction check
---> Package ambari-agent.x86_64 0:2.1.0-1470 will be installed
--> Finished Dependency Resolution
Dependencies Resolved
====================================================================================================================================================================
Package Arch Version Repository Size
====================================================================================================================================================================
Installing:
ambari-agent x86_64 2.1.0-1470 Updates-ambari-2.1.0 19 M
Transaction Summary
====================================================================================================================================================================
Install 1 Package(s)
Total download size: 19 M
Installed size: 28 M
Is this ok [y/N]: Y
Downloading Packages:
ambari-agent-2.1.0-1470.x86_64.rpm | 19 MB 00:26
Running rpm_check_debug
Running Transaction Test
Transaction Test Succeeded
Running Transaction
Installing : ambari-agent-2.1.0-1470.x86_64 1/1
Verifying : ambari-agent-2.1.0-1470.x86_64 1/1
Installed:
ambari-agent.x86_64 0:2.1.0-1470
Complete!
[root@hadoopn1 yum.repos.d]# ambari-agent start
Verifying Python version compatibility...
Using python /usr/bin/python2.6
Checking for previously running Ambari Agent...
Starting ambari-agent
Verifying ambari-agent process status...
Ambari Agent successfully started
Agent PID at: /var/run/ambari-agent/ambari-agent.pid
Agent out at: /var/log/ambari-agent/ambari-agent.out
Agent log at: /var/log/ambari-agent/ambari-agent.log
* Setup the Ambari Server
[root@hadoopsirji yum.repos.d]# ambari-server setup
Once the installation is complete, your Ambari-Server setup will be completed.
* Start the Ambari-server and Ambari-Agent
[root@hadoopsirji yum.repos.d]# sudo ambari-server start
[root@hadoopsirji yum.repos.d]# sudo ambari-agent start
* Ambari-Server and Agent cane be started/Stopped and queried for their status
[root@hadoopsirji yum.repos.d]# sudo ambari-agent start/stop/stauts
The default port which is available for Ambari Server to run is 8080. With Fully Qualified Host/Server name and port 8080 Ambari web manager can be accessed. By Default the credentials for ambari web page are admin/admin.
Open the browser and provide http://localhost:8080 (In case a hostname is provided, localhost will be replaced by it's name. In case of my system the link will be
http://hadoopsirji:8080
Default username and password are - (admin / admin)
Till now we have installed the Ambari-server and Ambari-Agent on one server. In multinode cluster, other nodes do not require to install Ambari-server. On other nodes, only Ambari-agent installation is required.


